Boot with GRUB
GRUB: it's neither larva, fast food nor the loveliest of acronyms in the GNU herd of free software. Rather, GRUB is the GNU GRand Unified Bootloader. And, it is truly the greatest loader for booting Linux and practically any other OS—open source or otherwise—you may have scattered on your platters.
GRUB is independent of any particular operating system and may be thought of as a tiny, function-specific OS. The purpose of the GRUB kernel is to recognize filesystems and load boot images, and it provides both menu-driven and command-line interfaces to perform these functions. The command-line interface in particular is quite flexible and powerful, with command history and completion features familiar to users of the bash shell.
GRUB is in its element with the multiboot, multidisk systems typical of Linux and open-source adventurers who may simultaneously test or track several Linux distributions, the BSDs, GNU/Hurd, BeOS and perhaps that vestigial partition for Mr. Bill. Even if you stick with LILO as your system's primary boot loader, it's smart to keep a GRUB boot floppy handy as the best and fastest way to get your system back if you otherwise cream your master boot record (MBR). If you have done any number of multiboot installations, you know exactly what I'm talking about. Should you need any more reasons for considering GRUB, check out the sidebar, “Why GRUB”. Let's get started!
Installation of GRUB is a two-step process. The first step is to install or build GRUB in a host OS environment, and for this we will, of course, use Linux. The second step is to install and configure GRUB as the boot loader for your system.
The first step is the usual: download the source archive, untar it, configure and make install. Assuming you have found a source mirror (see www.gnu.org/software/grub/grub.html) and downloaded the source distribution into a suitable working directory, continue with:
tar -xzvf grub-0.5.96.1.tar.gz cd grub-0.5.96.1 ./configure make make install
This should create the executables: grub, grub-install and mbchk; install support files in /usr/local/share/grub/i386-pc/, and install the GNU information manual and man pages.
For the second step of installation, we will first build and work with a GRUB boot floppy. This way we can use GRUB to learn about its features while testing various configurations for our particular system. After getting comfortable with the GRUB setup on floppy, we will then install it onto the MBR of the system's first hard disk. Even if you decide not to install GRUB on your hard disk right away, no harm done: you will now have your own GRUB boot floppy available to rescue systems with trashed boot loaders.
GRUB recognizes a number of different filesytem types, including Linux ext2fs, Reiser, MINIX, BSD's ffs, as well as FAT, so it is possible to make a GRUB boot floppy with any of these filesystems. We will stick to FAT for this example, however, because it is the lowest common denominator, and most OSes have tools for mounting and reading/writing files on FAT floppies. That way, we will always be able to get to its menu configuration file if we need to.
Scrounge around in your junk drawer for some unused floppy (a new one would be even better), and give it a fresh format and FAT filesystem:
fdformat /dev/fd0 mkfs -t msdos /dev/fd0
We are going to put some files on this disk, so go ahead and mount to your usual floppy mount point (here I use /floppy):
mount -t msdos /dev/fd0 /floppyNow install the directories and files GRUB will need:
mkdir -p /floppy/boot/grub cp /usr/local/share/grub/i386-pc/stage* /floppy/boot/grubThe floppy can then be unmounted, umount /floppy, but leave it in the drive. The GRUB floppy is prepared and ready for the final installation, which is to install the GRUB boot loader in the MBR of the floppy itself. For that, we will use the grub executable we have built with our Linux installation. Start the executable at the Linux command prompt: grub.
This brings up an emulator of GRUB's command shell environment, which looks like Figure 1. We will discuss the features of this shell in more detail a little further on. For now, enter the following series of commands at the grub prompt:
grub> root (fd0) grub> setup (fd0) grub> quit
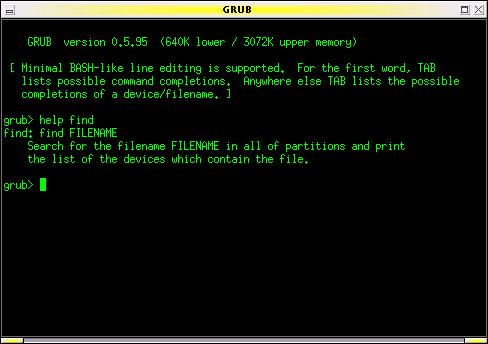
Figure 1. GRUB in command-line mode. Note the on-line help (here the GRUB emulator is running under Linux in an xterm window).
And that's it! This sequence of commands completes the installation of GRUB on the floppy disk. It is now bootable and will allow us to boot any other OS on our system.
Read more...
http://www.linuxjournal.com/article/4622
I love Grub and Yes... I have messed up my Grub install and or my MBR more than once!:O But, I have also found a great tool that will automatically fix your Grub or your Windows MBR back to, say the Wind XP Setup. It's called Super Grub Disk. Check it out too, I have Blogged on it before...
| ||||||
|
Don
No comments:
Post a Comment