Don
What is Clonezilla?
Clonezilla is a partition and disk imaging/cloning program similar to True Image® or Norton Ghost®. It helps you to do system deployment, bare metal backup and recovery. Two types of Clonezilla are available, Clonezilla live and Clonezilla SE (server edition). Clonezilla live is suitable for single machine backup and restore. While Clonezilla SE is for massive deployment, it can clone many (40 plus!) computers simultaneously. Clonezilla saves and restores only used blocks in the hard disk. This increases the clone efficiency. With some high-end hardware in a 42-node cluster, a multicast restoring at rate 8 GB/min was reported.Features:
- Many File systems are supported: (1) ext2, ext3, ext4, reiserfs, reiser4, xfs, jfs, btrfs, f2fs and nilfs2 of GNU/Linux, (2) FAT12, FAT16, FAT32, NTFS of MS Windows, (3) HFS+ of Mac OS, (4) UFS of FreeBSD, NetBSD, and OpenBSD, (5) minix of Minix, and (6) VMFS3 and VMFS5 of VMWare ESX. Therefore you can clone GNU/Linux, MS windows, Intel-based Mac OS, FreeBSD, NetBSD, OpenBSD, Minix, VMWare ESX and Chrome OS/Chromium OS, no matter it's 32-bit (x86) or 64-bit (x86-64) OS. For these file systems, only used blocks in partition are saved and restored. For unsupported file system, sector-to-sector copy is done by dd in Clonezilla.
- LVM2 (LVM version 1 is not) under GNU/Linux is supported.
- Boot loader, including grub (version 1 and version 2) and syslinux, could be reinstalled.
- Both MBR and GPT partition formats of hard drive are supported. Clonezilla live also can be booted on a BIOS or uEFI machine.
- Unattended mode is supported. Almost all steps can be done via commands and options. You can also use a lot of boot parameters to customize your own imaging and cloning.
- One image restoring to multiple local devices is supported.
- Image could be encrypted. This is done with ecryptfs, a POSIX-compliant enterprise cryptographic stacked filesystem.
- Multicast is supported in Clonezilla SE, which is suitable for massive clone. You can also remotely use it to save or restore a bunch of computers if PXE and Wake-on-LAN are supported in your clients.
- The image file can be on local disk, ssh server, samba server, NFS server or WebDAV server.
- AES-256 encryption could be used to secures data access, storage and transfer.
- Based on Partclone (default), Partimage (optional), ntfsclone (optional), or dd to image or clone a partition. However, Clonezilla, containing some other programs, can save and restore not only partitions, but also a whole disk.
- By using another free software drbl-winroll, which is also developed by us, the hostname, group, and SID of cloned MS windows machine can be automatically changed.
Minimum System Requirements for Clonezilla live:
- X86 or x86-64 processor
- 196 MB of system memory (RAM)
- Boot device, e.g. CD/DVD Drive, USB port, PXE, or hard drive
Limitations:
- The destination partition must be equal or larger than the source one.
- Differential/incremental backup is not implemented yet.
- Online imaging/cloning is not implemented yet. The partition to be imaged or cloned has to be unmounted.
- Due to the image format limitation, the image can not be explored or mounted. You can _NOT_ recovery single file from the image. However, you still have workaround to make it, read this.
- Recovery Clonezilla live with multiple CDs or DVDs is not implemented yet. Now all the files have to be in one CD or DVD if you choose to create the recovery iso file.
License:
- Clonezilla itself is licensed under the GNU General Public License (GPL) Version 2. However, to run Clonezilla, a lot of free and open source software, e.g. the Linux kernel and a minimal GNU/Linux OS, are required.
Which Clonezilla Shall I Use ?
- Clonezilla Live: Clonezilla live allows you to use CD/DVD or USB flash drive to boot and run clonezilla (Unicast only)
- Clonezilla SE: Clonezilla SE is included in DRBL, therefore a DRBL server must first be set up in order to use Clonezilla to do massively cloning (unicast, broadcast and multicast are supported)
Go there...
How to use Clonezilla live ?
Once you have the bootable Clonezilla Live media, as created in the previous step, you can boot it in the machine you want to clone. Remember to use the Clonezilla live media, such as CD, USB flash drive, USB hard drive, hard drive or PXE to boot the machine. For example, if you have Clonezilla Live in USB flash drive, you have to boot it via USB device (Ex. USB-HDD or USB-ZIP). If necessary, you can set the first boot priority in the BIOS as USB-HDD or USB-ZIP so that it can boot Clonezilla Live from your USB flash drive.- You can refer to these step-by-step examples, which provide more details, e.g. how to save an image, to restore an image, to clone a disk, to restore an image to multiple disks, to create recovery CD, and more... //New for the latest stable Clonezilla live 2.3.2-22 with new features: webdav and encryption!//

- For general introduction about using the Clonezilla live, please check this doc.
- Some videos about using Clonezilla live.
Go there...
http://clonezilla.org/clonezilla-usage/clonezilla-live-usage.php
This doc generally describes how to use Clonezilla live.
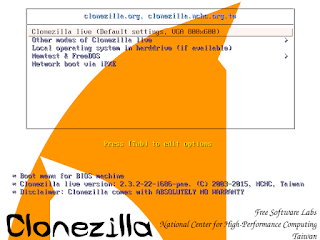
Here is a screenshot of Clonezilla Live boot menu:
The first one is the default mode for Clonezilla Live. It will default to framebuffer mode with a resolution of 1024x768.
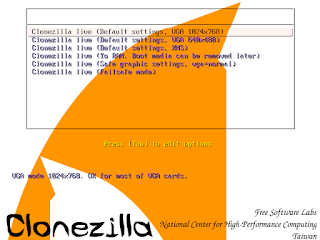
There are more modes which you can choose in the 2nd choice "Other modes of Clonezilla live", e.g. 800X600 or 640x480 one if you want, as shown here:

The choice, "Clonezilla live (To RAM. Boot media can be removed later), is the same function with the 1st one except when Clonezilla live booting finishes, all the necessary files are copied to memory. Therefore you can remove the boot media (CD or USB flash drive) then.
If you do not need Chinese or Japanese environment or if your computer experiences problems in the framebuffer mode, you can choose the one "Clonezilla Live (no framebuffer)" to clone in the English environment.
The choice, "Clonezilla live (failsafe mode)", is for something goes wrong when you are not be able to boot your machine, such as ACPI of your machine is not supported in the kernel.
If you want to boot local OS in your harddrive, you can choose the one "Local operating system in harddrive (if available)". This is an extra function in the boot media that has nothing to do with Clonezilla Live.
The choice, "FreeDOS", allows you to boot your machine into Free DOS. This is an extra function in the boot media that has nothing to do with Clonezilla Live.
The choice, "Memory test using Memtest86+," is for memory testing using Memtest86+. This is an extra function in the boot media that has nothing to do with Clonezilla Live.
The choice, "Network boot via etherboot" or "Network boot via gpxe" is used to perform a network boot via Etherboot or gPXE. If your computer does not have a PXE network, you can use this to do boot from a network. This is an extra function in the boot media that has nothing to do with Clonezilla Live.

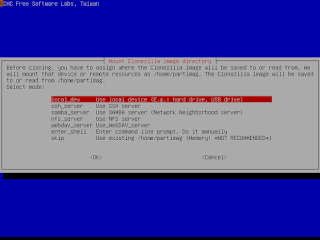
///Note/// The image name of Clonezilla is actually a directory name. For example, if you give the image name as 2007-05-NOVISTA, all the info will be saved as in the directory /home/partimag/2007-05-NOVISTA/. Inside that directory, MBR, partition table and partition files will be stored. Therefore when you want to restore an image, remember to mount the /home/partimag as the right device or path. i.e. the directory 2007-05-NOVISTA must be in the clonezilla home directory (Ex. /home/partimag)

- Run "sudo su -" to become root.
- You must prepare another writable device or space and mount it as /home/partimag (Note! If your boot media is writable, such as USB flash drive or you choose to use To RAM option, the existing /home/partimag is linked to /live_media/home/partimag, You have to remove that file and create a directory /home/partimag as a mount point by "rm -f /home/partimag; mkdir -p /home/partimag).
Ex. If you want to use Clonezilla to save /dev/hda and put the image in /dev/hdb1, then you have to mount /dev/hdb1 as /home/partimag by "mount -t auto /dev/hdb1 /home/partimag". If the file system of /dev/hdb1 is ntfs, you have to use "ntfs-3g /dev/hdb1 /home/partimag" to mount it so that it's writable. Remember, sshfs and smbfs are also supported. For example, using sshfs, you can mount your remote ssh server:
sshfs ACCOUNT@SSH_SERVER:/ABSOLUTE_PATH /home/partimag
i.e. if you want to mount your ssh server 192.168.100.254 with directory /work/pool, run it like this:
sshfs root@192.168.100.254:/work/pool /home/partimag
If you want to mount your samba server 192.168.200.254 with directory /work/smb, run it like this:
mount -t cifs -o user=your_user_name //192.168.200.254/work/smb /home/partimag
If you want to mount your samba server 192.168.200.254 with directory /work/smb, with username "administrator" and password "pass", run it like this:
mount -t cifs -o user=administrator,password=pass //192.168.200.254/work/smb /home/partimag
///NOTE/// In the above command, do NOT use smbfs in Linux, use cifs, since cifs has better compatibility with MS windows file sharing. Clonezilla live will FAIL to save a correct image when you use smbfs!
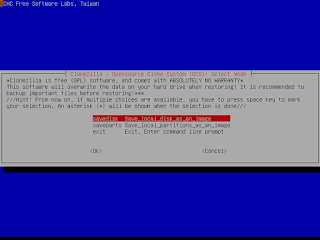
- Run "clonezilla" to use Clonezilla, then follow the on-screen instructions.
http://clonezilla.org/clonezilla-usage/general-live-use.php
Videos about Clonezilla live usage
On YouTube there are a lot of videos about how to use Clonezilla (more than 9,000 videos in Jan/2014). Here are some about using Clonezilla live:
- Create Windows Backup / Restore Partition with Clonezilla by Britec
- Backup with Clonezilla | LAS | s25e10
- How To Backup AND Restore you Computer with CloneZilla! (BEST HD Tutorial!!)
- Disk to Disk Copy with Clonezilla
- How to Do a System Backup Using Clonezilla
- How to use CloneZilla Tutorial (Making an image file and copying it to another computer)
- Clonezilla - Backup Linux/Ubuntu System
If you have one and you'd like to be linked here, please email to steven _at_ stevenshiau org.
http://clonezilla.org/clonezilla-usage/clonezilla-live-videos.php
| Disk to disk clone |
| Description: Clone small disk to larger disk (e.g. 8 GB to 20 GB) (Step by step) |
| Preseed options to do job after booting |
| Description: Preseed some options to do restoring job after booting |
| Started with sshd on and passwd assigned |
| Description: Run unattended Clonezilla live via PXE or CD booting and the process can be remotely monitored |
| Add extra driver |
| Description: How to put your own binary driver in Clonezilla live without modifying /live/filesystem.squashfs |
| Customized script with PXE |
| Description: Use customized script with a PXE version of Clonezilla live |
| Screen session with PXE |
| Description: Run unattended Clonezilla live via PXE booting and the process can be remotely monitored |
| Burn Clonezilla live CD |
| Description: Create Clonezilla live CD by InfraRecorder |
| LinuxLive USB creator |
| Description: Create Clonezilla live USB flash drive by LinuxLive USB creator |
| Misc |
| Description: Misc doc |
Last modified: Wed Apr 6 0:37:04 MDT 2016.
Go there...
http://clonezilla.org/clonezilla-live-doc.php
Clonezilla Disk Imaging and Cloning Software...
- Clonezilla
- clonezilla - Google Search
- Clonezilla (OpenSource clone system)
- Clonezilla Live download
- Clonezilla Live on hard drive
- Clonezilla-live download
- Clonezilla-SysRescCD LiveCD
- GParted-Clonezilla -- LiveCD
- GParted-Clonezilla LiveCD
- http://drbl.org/faq/fine-print.php?path=./2_System/43_read_ntfsimg_content.faq#43_read_ntfsimg_content.faq
- new-cool-list-linux.html
- Clonezilla
- Clonezilla live
- DonsDeals: Clonezilla How Too's
- DonsDeals: Clonezilla (I use this to make Partition Backups of my Systems)
- Clonezilla Live on USB
- Clonezilla live usage
- Clonezilla - Live Doc
- General Clonezilla live usage
- Videos about Clonezilla live usage
- Linux Distro - DRBL (Diskless Remote Boot in Linux) is free software open source solution to managing the deployment of the GNU Linux operating system across many clients
- Clonezilla - Sever Edition
- Diskless Remote Boot in Linux (DRBL) - Browse /drbl_stable at SourceForge.net
- Diskless Remote Boot in Linux (DRBL) download | SourceForge.net
- DonsDeals Blog: DRBL
- DRBL - About
- DRBL command
- DRBL Diskless Remote Boot to ISO file in Linux - Google Search
- DRBL - Downloads
- DRBL - Downloads
- DRBL - Downloads
- DRBL - FAQ/Q&A
- DRBL - FAQ/Q&A
- DRBL - FAQ/Q&A
- DRBL - FAQ/Q&A
- DRBL - FAQ/Q&A
- DRBL - FAQ/Q&A - FAQ/Q&A for DRBL and Clonezilla
- DRBL - FAQ/Q&A - How can I add a program in the main file system of Clonezilla live, i.e. in the file "filesystem.squashfs"?
- DRBL - FAQ/Q&A - How can I put the kickstart file for netinstall GNU/Linux ?
- DRBL - FAQ/Q&A - I have more than 1 network card on my DRBL client, how can I force the client to use the specific network card, i.e. with priority, to connect to DRBL server when booting in the initramfs?
- DRBL - FAQ/Q&A - I knew the network card of my DRBL client is supported by the kernel, however it fails to load the module during PXE booting. What can I do?
- DRBL - FAQ/Q&A - There is an existing DHCP service in my environment, so it's impossible for me to use the dhcp service comes with DRBL server. Any solution ?
- DRBL installation
- DRBL - Installation
- Index of /drbl-core/src
- Linux Distro - Parted Magic
- news – Parted Magic
- adding_programs – Parted Magic
- downloads – Parted Magic
- parted magic - Google Search
- start – Parted Magic
No comments:
Post a Comment